TuteeTally Developer Guide
Acknowledgements
The following table contains the numerous third party libaries, API and documentation consulted during the course of developing TuteeTally.
| Name | Description |
|---|---|
| AddressBook-Level 3 (AB-3) | Tuteetally is adapted from AB-3 that is created by the SE-EDU initiative. |
| Gradle | Used for build automation |
| Jackson | Used for parsing JSON files. |
| JavaFX | Used in rendering the GUI. |
| JUnit5 | Used for testing the codebase. |
| Oracle Java Docs | Used for understanding the default Java API |
Setting up, getting started
Refer to the guide Setting up and getting started.
Design
Architecture
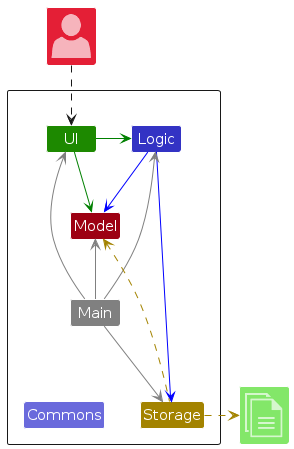
The Architecture Diagram given above explains the high-level design of the App.
Given below is a quick overview of main components and how they interact with each other.
Main components of the architecture
Main (consisting of classes Main and MainApp) is in charge of the app launch and shut down.
- At app launch, it initializes the other components in the correct sequence, and connects them up with each other.
- At shut down, it shuts down the other components and invokes cleanup methods where necessary.
The bulk of the app's work is done by the following four components:
UI: The UI of the App.Logic: The command executor.Model: Holds the data of the App in memory.Storage: Reads data from, and writes data to, the hard disk.
Commons represents a collection of classes used by multiple other components.
How the architecture components interact with each other
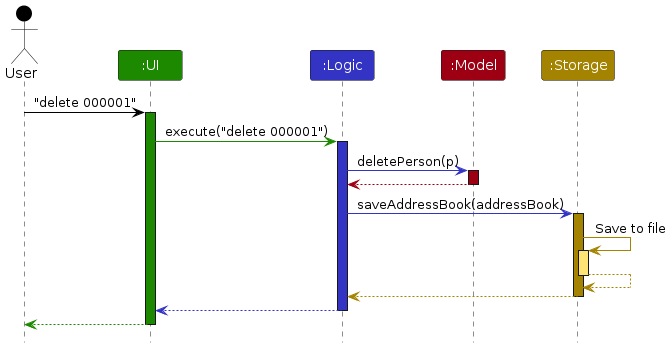
The Sequence Diagram below shows how the components interact with each other for the scenario where the user issues the command delete 1.
Each of the four main components (also shown in the diagram above),
- defines its API in an
interfacewith the same name as the Component. - implements its functionality using a concrete
{Component Name}Managerclass (which follows the corresponding APIinterfacementioned in the previous point.
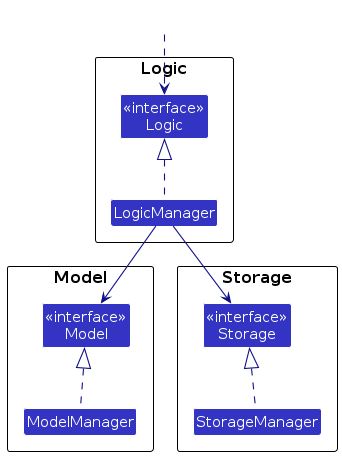
For example, the Logic component defines its API in the Logic.java interface and implements its functionality using the LogicManager.java class which follows the Logic interface. Other components interact with a given component through its interface rather than the concrete class (reason: to prevent outside component's being coupled to the implementation of a component), as illustrated in the (partial) class diagram below.
The sections below give more details of each component.
UI component
The API of this component is specified in Ui.java
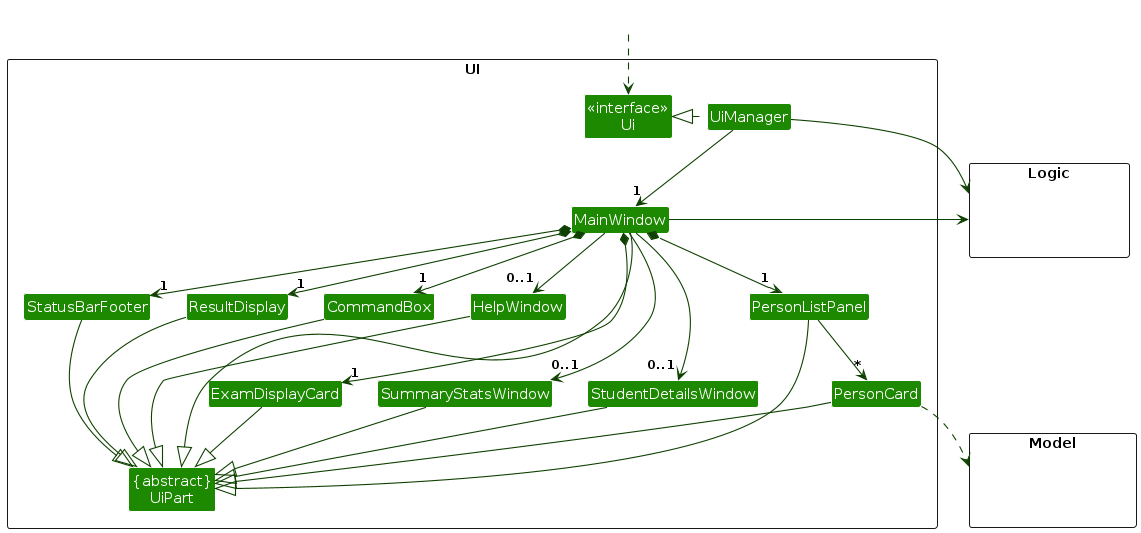
The UI consists of a MainWindow that is made up of parts e.g.CommandBox, ResultDisplay, PersonListPanel, StatusBarFooter etc. All these, including the MainWindow, inherit from the abstract UiPart class which captures the commonalities between classes that represent parts of the visible GUI.
The UI component uses the JavaFx UI framework. The layout of these UI parts are defined in matching .fxml files that are in the src/main/resources/view folder. For example, the layout of the MainWindow is specified in MainWindow.fxml
The UI component,
- executes user commands using the
Logiccomponent. - listens for changes to
Modeldata so that the UI can be updated with the modified data. - keeps a reference to the
Logiccomponent, because theUIrelies on theLogicto execute commands. - depends on some classes in the
Modelcomponent, as it displaysPersonobject residing in theModel.
Logic component
API : Logic.java
Here's a (partial) class diagram of the Logic component:

The sequence diagram below illustrates the interactions within the Logic component, taking execute("delete 1") API call as an example.
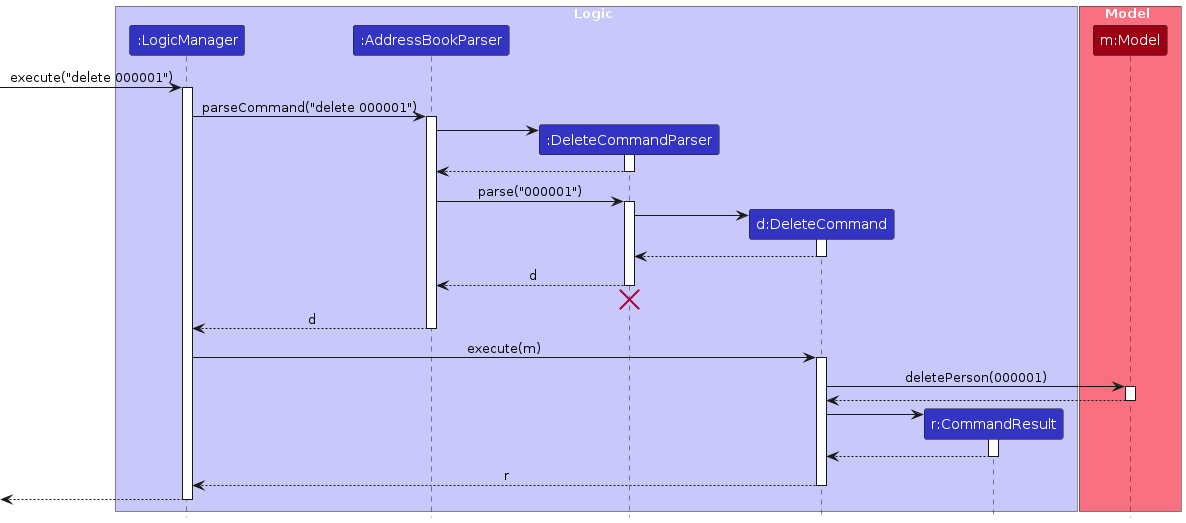
Note: The lifeline for DeleteCommandParser should end at the destroy marker (X) but due to a limitation of PlantUML, the lifeline continues till the end of diagram.
How the Logic component works:
- When
Logicis called upon to execute a command, it is passed to anAddressBookParserobject which in turn creates a parser that matches the command (e.g.,DeleteCommandParser) and uses it to parse the command. - This results in a
Commandobject (more precisely, an object of one of its subclasses e.g.,DeleteCommand) which is executed by theLogicManager. - The command can communicate with the
Modelwhen it is executed (e.g. to delete a person).
Note that although this is shown as a single step in the diagram above (for simplicity), in the code it can take several interactions (between the command object and theModel) to achieve. - The result of the command execution is encapsulated as a
CommandResultobject which is returned back fromLogic.
Here are the other classes in Logic (omitted from the class diagram above) that are used for parsing a user command:
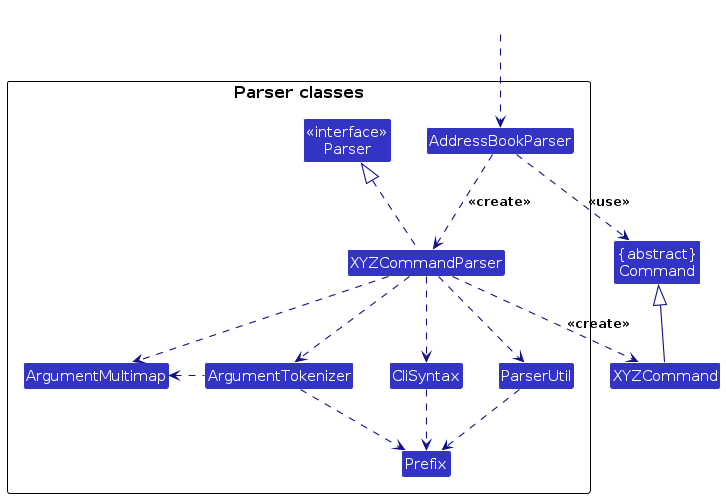
How the parsing works:
- When called upon to parse a user command, the
AddressBookParserclass creates anXYZCommandParser(XYZis a placeholder for the specific command name e.g.,AddCommandParser) which uses the other classes shown above to parse the user command and create aXYZCommandobject (e.g.,AddCommand) which theAddressBookParserreturns back as aCommandobject. - All
XYZCommandParserclasses (e.g.,AddCommandParser,DeleteCommandParser, ...) inherit from theParserinterface so that they can be treated similarly where possible e.g, during testing.
Model component
API : Model.java
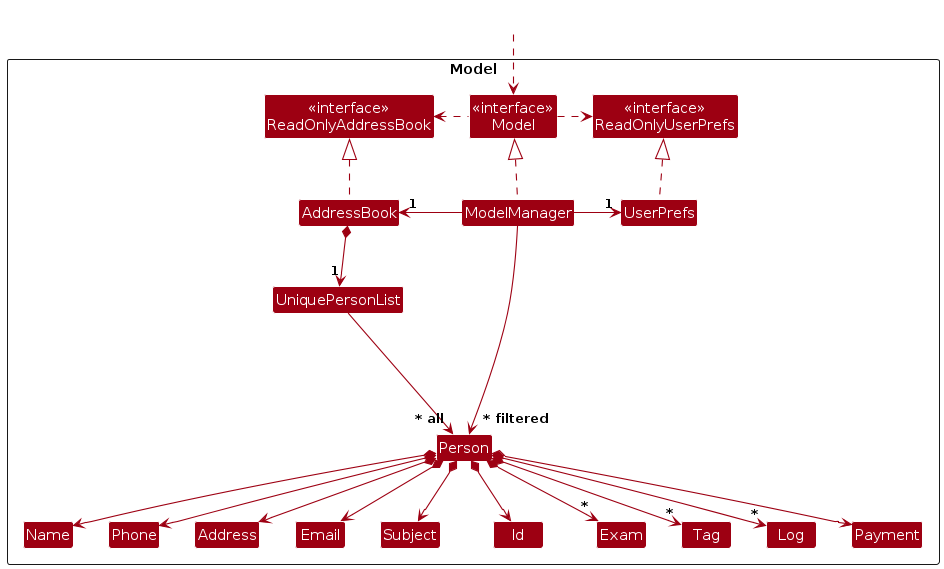
The Model component,
- stores the address book data i.e., all
Personobjects (which are contained in aUniquePersonListobject). - stores the currently 'selected'
Personobjects (e.g., results of a search query) as a separate filtered list which is exposed to outsiders as an unmodifiableObservableList<Person>that can be 'observed' e.g. the UI can be bound to this list so that the UI automatically updates when the data in the list change. - stores a
UserPrefobject that represents the user’s preferences. This is exposed to the outside as aReadOnlyUserPrefobjects. - does not depend on any of the other three components (as the
Modelrepresents data entities of the domain, they should make sense on their own without depending on other components)
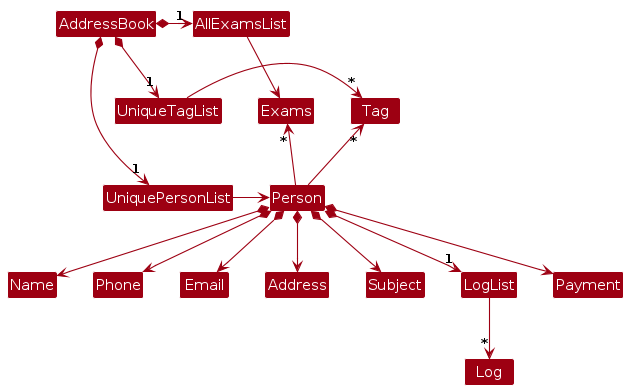
Note: An alternative (arguably, a more OOP) model is given below. It has a Tag list and a AllExamList in the AddressBook, which Person references.
This allows AddressBook to only require one Tag object per unique tag and correspondingly one Exam object per unique exam, instead of each Person needing their own Tag and Exam objects.
Storage component
API : Storage.java
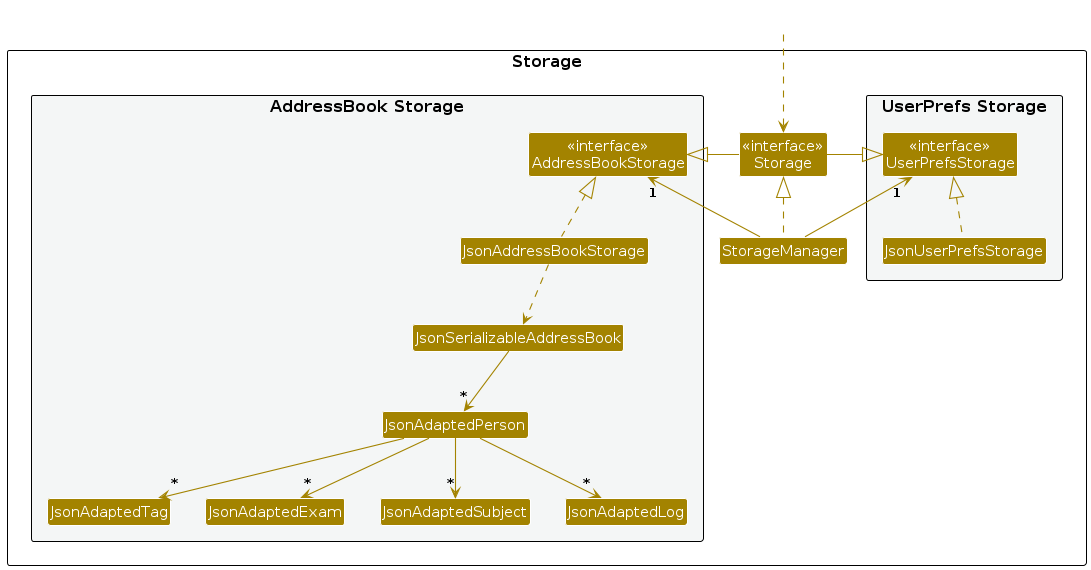
The Storage component,
- can save both address book data and user preference data in JSON format, and read them back into corresponding objects.
- inherits from both
AddressBookStorageandUserPrefStorage, which means it can be treated as either one (if only the functionality of only one is needed). - depends on some classes in the
Modelcomponent (because theStoragecomponent's job is to save/retrieve objects that belong to theModel)
Common classes
The Commons package in the seedu.address contains classes that are shared across various components of the application.
This ensures that common functionalities are easily accessible across the system and thus promote code reuse. This also simplifies the task of
updating or enhancing functionality in one place.
Below is a breakdown of the main categories within this package:
CoreThis category includes essential classes that are central to the application's operation:Config: Manages configuration settings of the application, such as file paths and application-level settings. It helps in maintaining a flexible codebase that can adapt to different deployment environments without requiring code changes.
GuiSettings: Holds GUI configuration details which can be serialized for persistence across sessions. This class includes settings such as window size, window position, and other UI-related preferences that enhance the user's experience by maintaining a consistent application state.
LogsCenter: Provides a central management facility for logging messages throughout the application. It configures the logging libraries and specifies the uniform format and logging levels, making the debugging process and monitoring of runtime behaviors more systematic.
ExceptionsThis category defines custom exceptions that handle specific error situations unique to the application:UtilUtility classes that provide helper functions and shared functionalities used by multiple components:
Implementation
Student Details Retrieval System
Introduction
This section of the developer guide covers the functionalities provided for retrieving student related details. This includes finding a student with a specific id or name, adding and checking past logs of a student, and retrieving summary statistics of all students.
Features Overview
This section describes some noteworthy details on how certain features are implemented.
- Viewing all: Displays full student list.
- Viewing by name: Displays students with at least one keyword in their name.
- Viewing by unique ID: Displays specific student with a matching unique ID.
- Adding log of a student: Adds a log to the log list attached to the student.
- Viewing logs of a student: Displays the specific student's log list.
- Viewing summary statistics: Displays summary statistics such as number of students and total outstanding payment.
View student feature
The view command is a feature that allows the user to find and retrieve details related to student(s).
It consists of 4 variants
view -all: shows all students currently recorded in TuteeTally.view -name: shows all students recorded with their name, or part of their name matching the input.view -id: finds (unique) student associated with the unique id, and opens the log window.view -stats: opens a popup for summary statistics with regard to all students.
Implementation
The checking of which variant of view is triggered is detected based on the presence of prefixes in ViewCommandParser#parse.
Only one prefix is allowed to be in the command format at once. If more than one prefix is present, the user will receive an error message to remind them only one prefix is allowed.
Design considerations:
Aspect: What to do when encountering more than 1 prefix:
Alternative 1 (current choice): Throws an error and prompts the user that only 1 prefix is allowed
- Pros: Easy to implement, unambiguous and structured.
- Cons: User will only be able to check the details provided by one view command at one time.
Alternative 2: Executes all variants given in the command.
- Pros: Gives quick overview of multiple view commands at once.
- Cons: Difficult to implement and requires drastic changes in GUI.
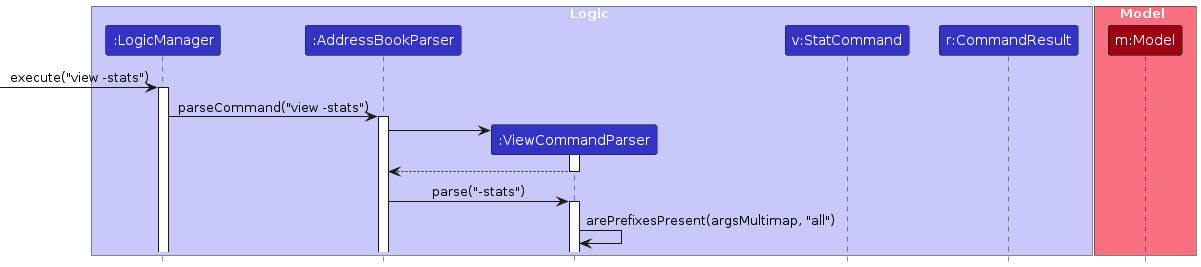
Example invocation procedure for view -stats command
Step 1: User first calls view -stats. The input is passed into AddressBookParser which instantiates a ViewCommandParser instance.
The ViewCommandParser uses ViewCommandParser#arePrefixesPresent to check for presence of the -add prefix.
Step 2: The check for -add prefix returns false, and a similar check routine for prefixes is carried out for -name and -id
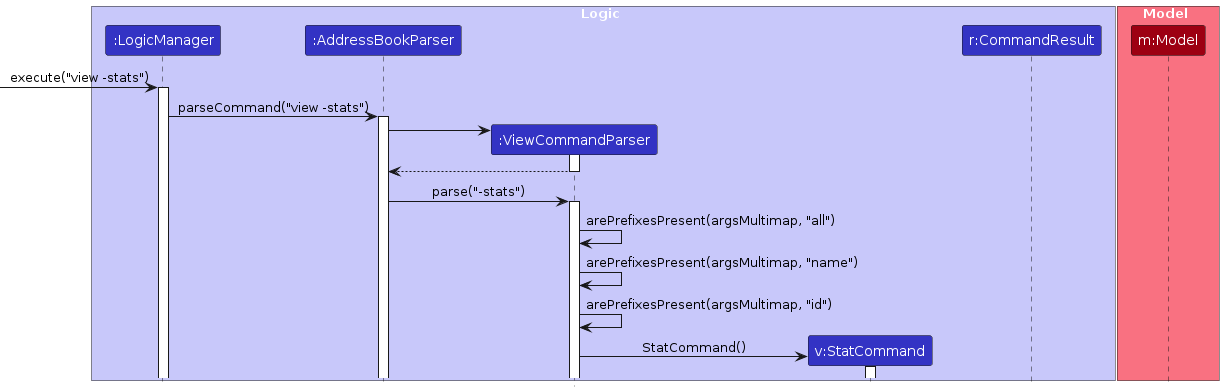
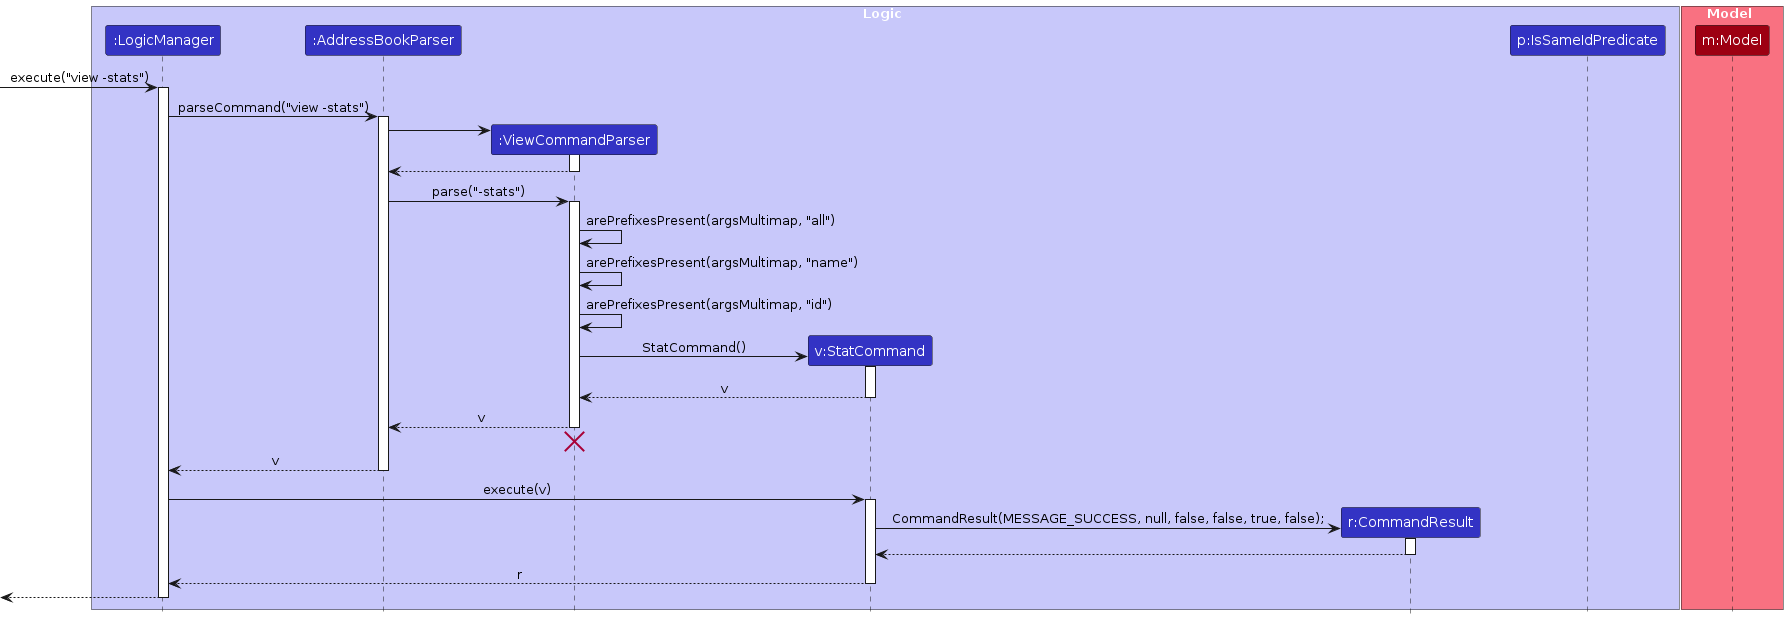
Step 3: The check for -stats return true, and a StatCommmand instance is returned to the LogicManager.
The LogicManager then executes StatCommand which returns a CommandResult with the isStatsCommand set to true.
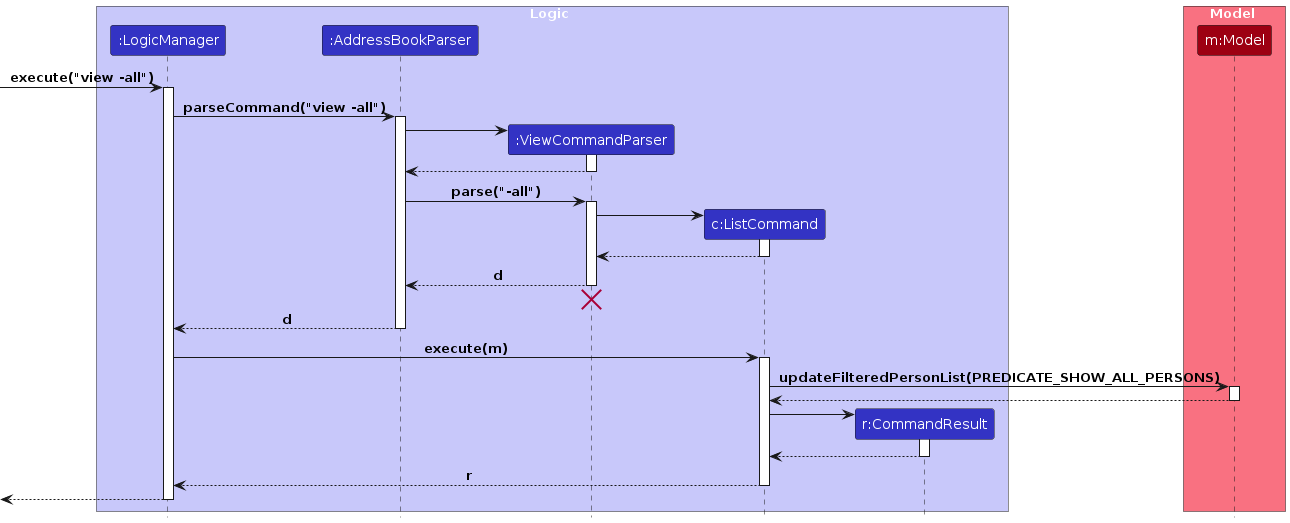
View all feature
This feature allows the user to see all current students stored in the app.
Implementation
The mechanism is similar to list feature in AddressBook. Parser checks for -all flag using the sequence above and execute showing the entire list of students.
The feature can return user to the whole list after user uses view -id/view -name function to see specific student. A list of students will only be displayed if there is at least 1 student added to TuteeTally.
Below is a sequence diagram of how view all interacts with multiple classes.
Design considerations:
Aspect: How view all executes:
Alternative 1 (current choice): In a view command class with view -id/-name.
- Pros: Easy to implement, clear execution line.
- Cons: Several if else checks, more prone to errors.
Alternative 2: Separate classes for view -all and other view commands
- Pros: Easy to implement, less merge conflicts.
- Cons: More files and parsers needed, might be difficult to navigate.
Filtering for students using view
For the prefixes -name and -id, a filtered list containing the search results will be returned.
Both variants utilize a similar logic to of passing in a prefix to model#updateFilteredPersonList to adjust the entries displayed by the GUI.

View Name
This feature allows the user to find all students with at least one matching keyword in their name.
Implementation
This mechanism is similar to the find command in AddressBook. Parser checks for the -name flag using the sequence above and places the keywords into a NameContainsKeywordsPredicate.
This command will display any student with at least one keyword fully matching with a part of the name. (e.g. John keyword will display John Lim but not Joh Ng). If there are no such students, an empty list will be displayed.
Design considerations:
Aspect: How view name finds students to display:
Alternative 1 (current choice): Returns students only if a part of their name fully matches a keyword.
- Pros: Easy to implement, only needs to check for equality of Strings.
- Cons: Prone to typos by the user.
Alternative 2: Returns students as long as their name contains all the characters of any keyword, and they appear in the right order.
- Pros: Enables more extensive searching, will allow room for typos.
- Cons: Harder to implement, user need to look through redundant names. (e.g. User wants to find student called
John, but has to first scroll throughJoJonand evenJames Ong)
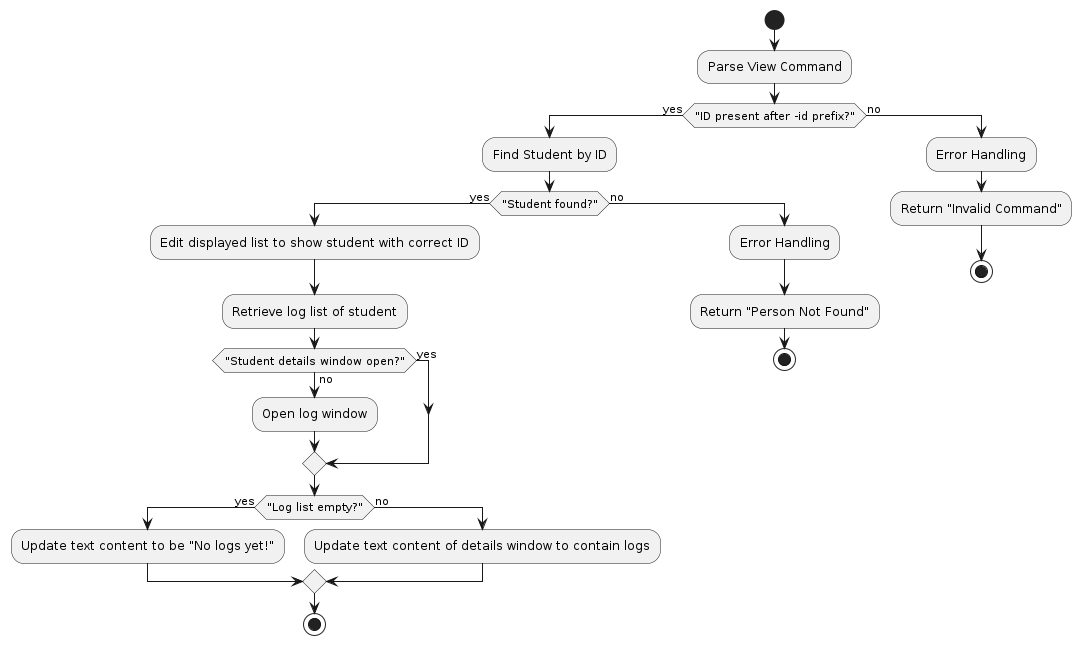
View student and their logs by ID Feature
This feature allows the user to search for a specific student with the corresponding ID. The list of all logs of the target student will also be displayed in a popup.
Implementation
Parser checks for the -id flag using the sequence above and checks if the id is a valid id. Then, it passes the id into a IsSameIdPredicate to filter for the student.
This command will display the student with the matching id, and open a popup containing their log information. If such a student does not exist, a prompt will be given to the user to retry.
Below is the activity diagram of how view -id executes.
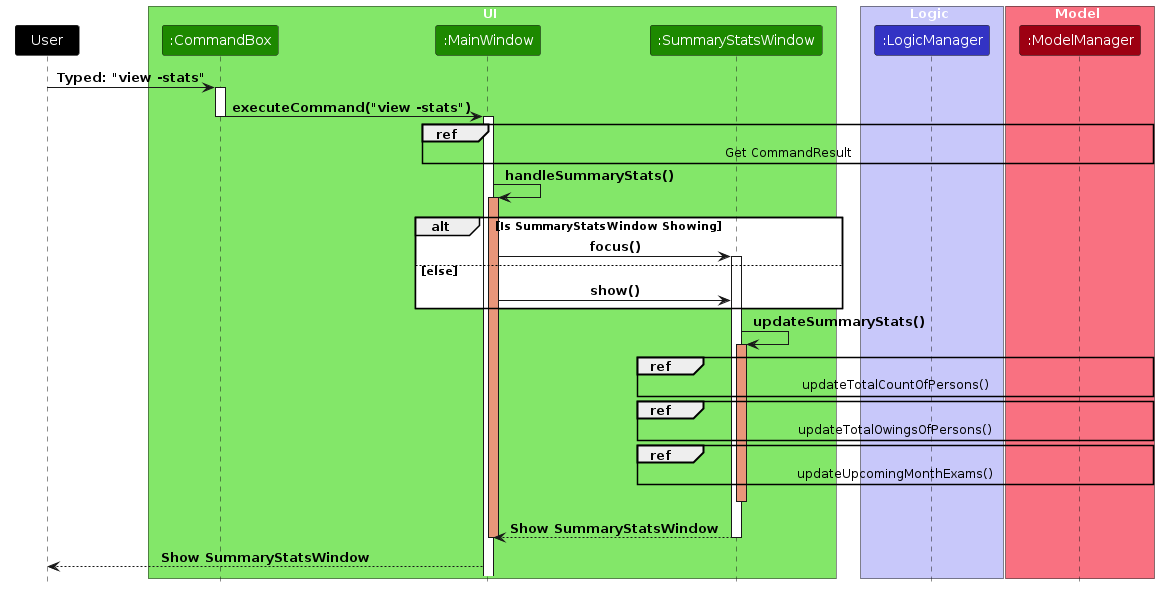
View Stats feature
This feature supports the viewing of summary statistics, it currently shows the
- the total number of students
- the total amount owed by students (Currently shows the exact amount)
- the number of upcoming exams in following 1 month period (from today up to the same day of the next month)
Implementation
Currently, the Summary Stats Window can be accessed in 3 ways.
- Typing
view -statsin the command box. - Pressing the
F2key on your keyboard. - Clicking the
Statsdropdown menu on the top of TuteeTally and accessing the Summary stats from there.
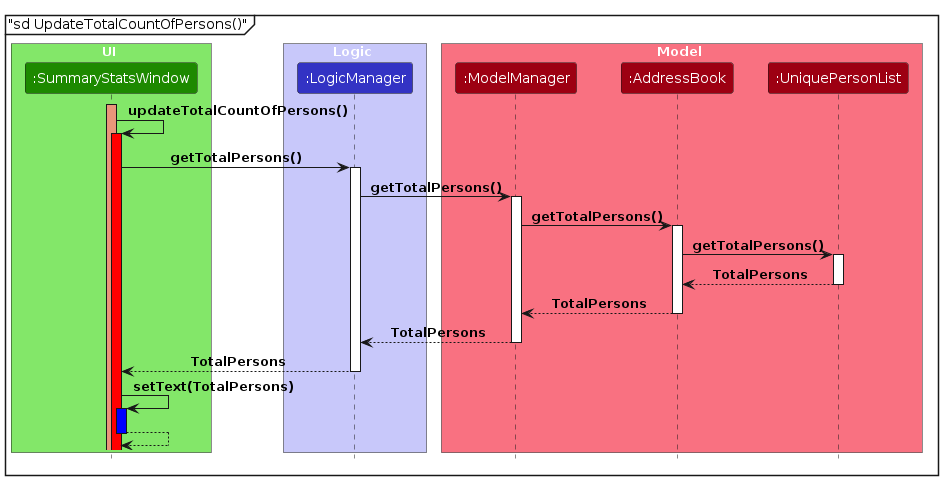
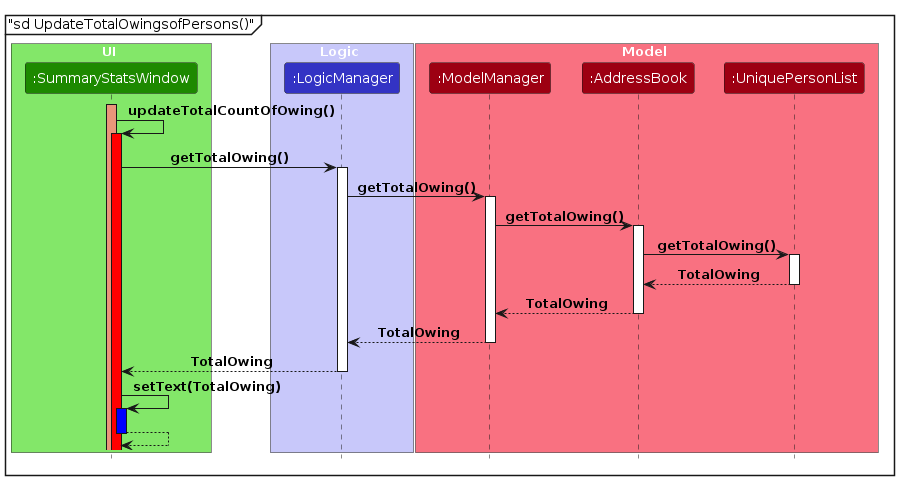
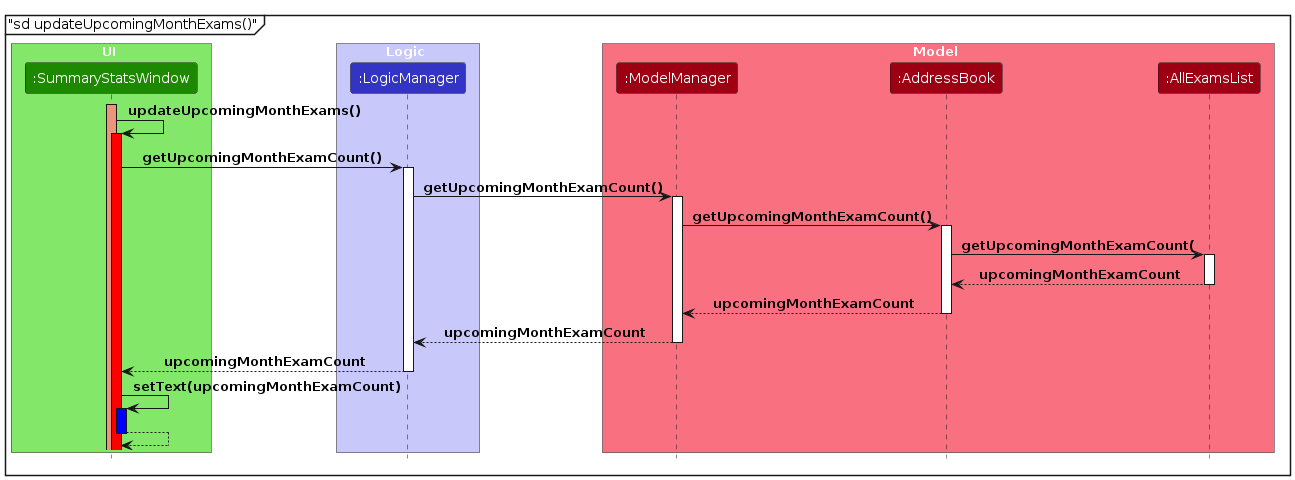
The Summary Stats window fetches the necessary stats from logic, which fetches the necessary data to update the statistics.
- getTotalPersons() to retrieve the total number of students.
- getTotalOwings() to calculate the total tuition fees owed.
- getUpcomingMonthExamCount() to count the exams scheduled for the upcoming month.
A Sequence Diagram can be seen below to show the interaction between the different class once "view -stats" is called:
The frame below shows how the logic class gets the command result.
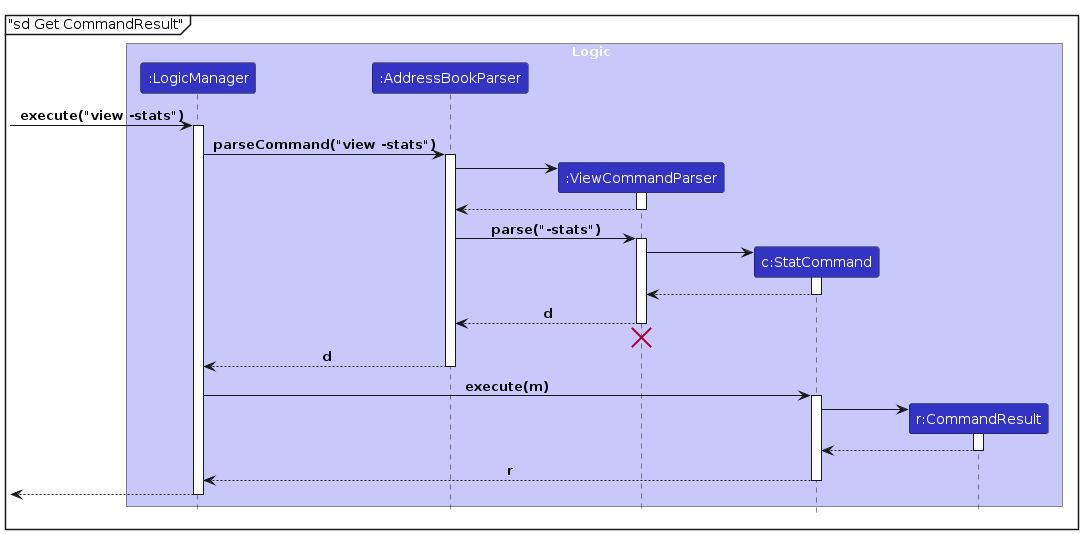
The CommandResult will then be returned to the UIManager and a SummaryStatsWindow Instance will be created, the Sequence diagram below shows how
it get the SummaryStats from Logicthe respective frame will show SummaryStatsWindow::updateSummaryStats clearly.
Design Considerations
Aspect: Where to store the SummaryStats:
Alternative 1 (current choice): The Summary Stats is stored in the
UniquePersonsListand is updated everytime their respective field get updated.- Pros: Easy access to this information and ensures that the statistics are always updated.
- Cons: High coupling, changes in the UniquePersonsList may have ripple effects on the parts of the application that depend on summary statistics.
Alternative 2: Compute statistics on demand
- Pros: Decreases the coupling between the data management and data viewing functionalities.
- Cons: Could lead to a delay in presenting statistics to the user since computations are performed at the time of request.
User Experience
- Useful Information: We want the user to have useful information in a quick manner to aid their tuition administration.
- Many ways to access: We want the user to have many ways to open the Summary Stats Window.
Add Log feature
This command is has a similar mechanism to the add feature, but targets a specific student instead.
This feature enables tutors to log session specific details for record to a specific student. Each log entry includes the total hours of the lesson, lesson content, the learning style of the student, as well as any additional notes. The date of the log entry is recorded as the system time when the user added the log.
Implementation
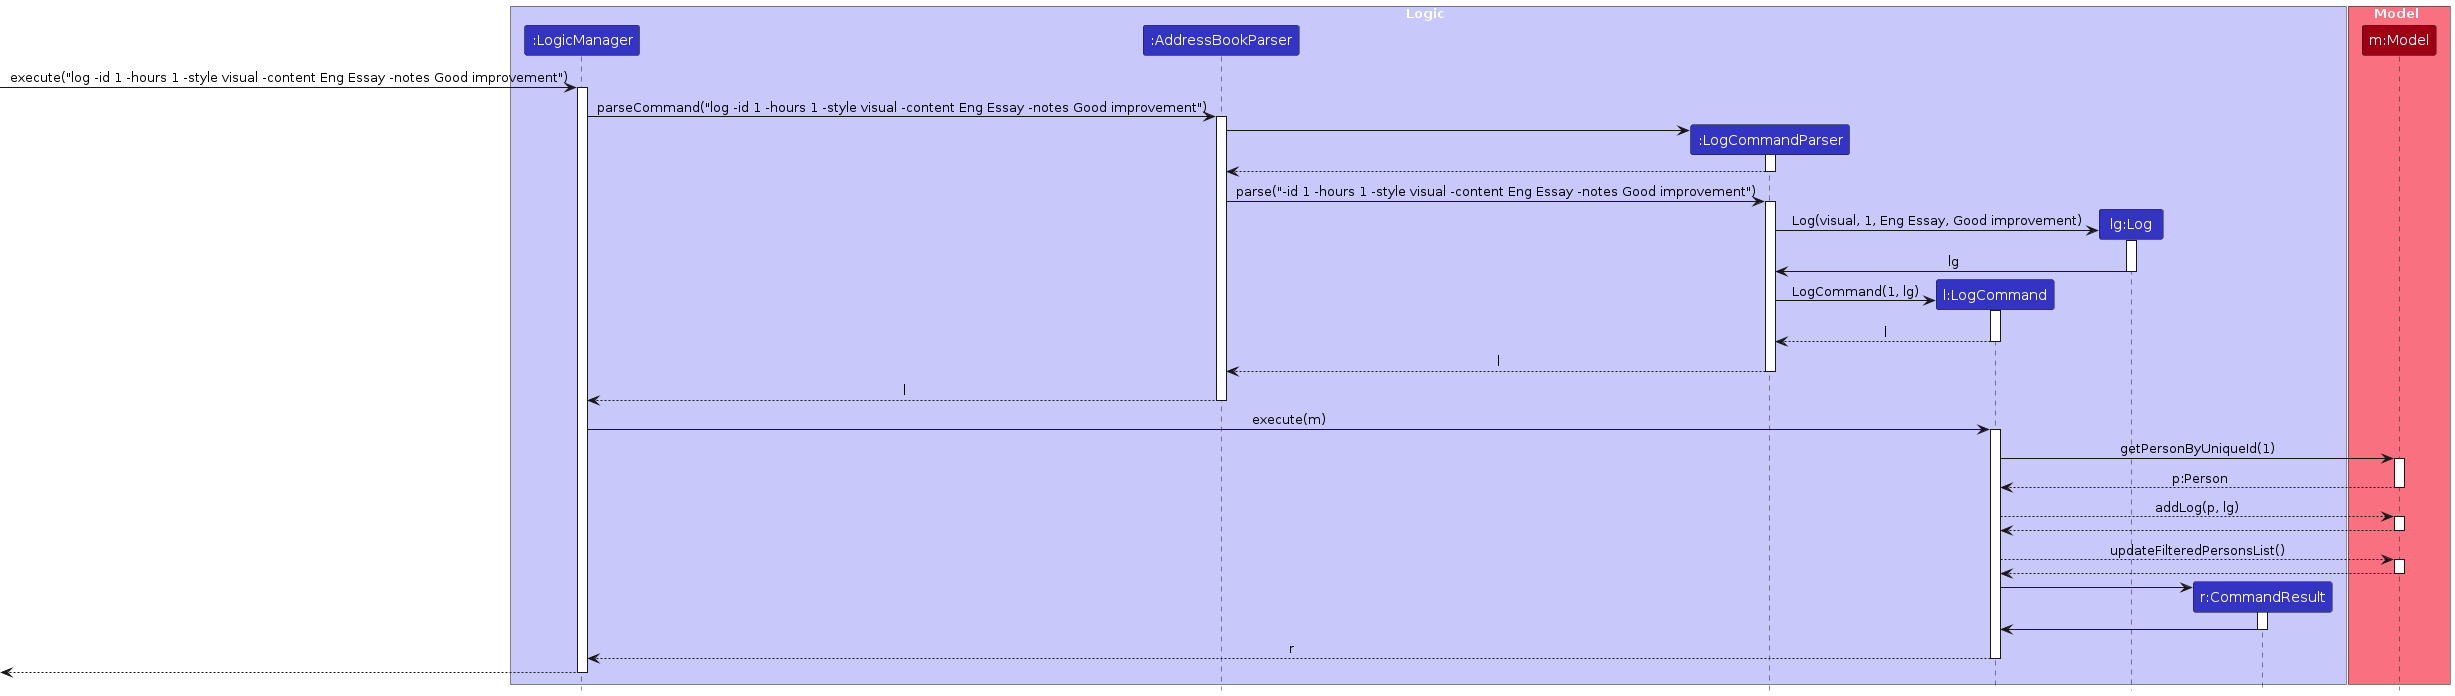
The parser first checks if the there exists a student with the ID specified using the -id in current records. Then, the app adds the log entry to the end of the log list attached as a field to the student.
Below is the sequence diagram of how the log command interacts with multiple classes.
Design Considerations
Aspect: Whether all fields in log should be compulsory
- Alternative 1 (current choice): All fields are compulsory
- Pros: Reminds user of all possible fields, gives structure to the display format of the log entries.
- Cons: Troublesome for user to enter all fields, mandates some content even if they deem it unnecessary
- Alternative 2: Only some fields like hours are compulsory
- Pros: Allows flexibility in user input, saves time for user
- Cons: Log entries will not be structured. Tutor may also accidentally forget important information to log, such as a change in learning style or lesson content covered. As we are currently in the early stage of development and have yet to carry out user testing for what fields should be compulsory, we chose to mandate every field so tutors are reminded of all possibly important aspects to record.
Aspect: Restrictions on log feature fields' contents
- Alternative 1 (current choice): All fields are strings, and can be empty
- Pros: Easy to implement, flexible, allowing customised inputs like
45 minutesfor hours instead of restricting to an integer. Allowing empty fields partially mitigates aforementioned con of being forced to enter content even if the user deems it unnecessary, all while still providing a reminder to possibly important fields. - Cons: Prone to user errors, which can make the log entry messy.
- Pros: Easy to implement, flexible, allowing customised inputs like
- Alternative 2: All fields have their own required format and data types.
- Pros: More systematic, less prone to user errors and typos.
- Cons: More complicated to implement and use.
Conclusion
This guide provides a concise overview of the student details retrieval system, designed to assist developers in understanding and utilizing these features effectively. For further details or clarification, please contact the development team.
Student Payment Management System
Introduction
This section of the developer guide covers the functionalities provided for managing student payments. It includes adding payments, marking payments as paid, and resetting payment statuses for students. These features are integral to maintaining accurate and up-to-date financial records for each student.
Features Overview
- Add Payment: Allows the addition of payment records to student accounts using unique identifiers.
- Mark Payment: Marks payments as completed for students, indicating that a payment has been made.
- Reset Payments: Resets the payment status of students, useful in scenarios where the total payment amount is fulfilled or adjustments are needed.
Add Payment Feature
The AddPaymentCommand enables users to add payment records to students by specifying a unique student ID and the payment amount.
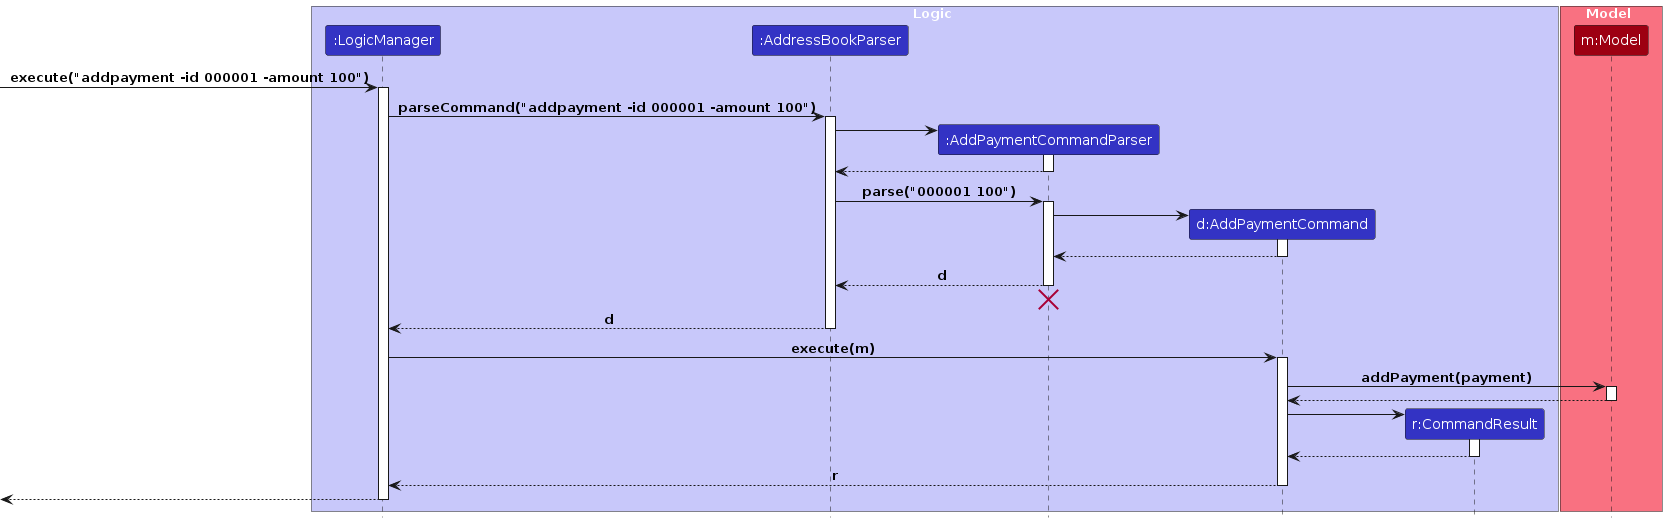
Implementation
- The user inputs a command with the
-addpaymentflag, followed by the student'suniqueIdand the amount. - The system parses this command, extracting the necessary details.
- A new payment record is created and added to the student's account in the system.

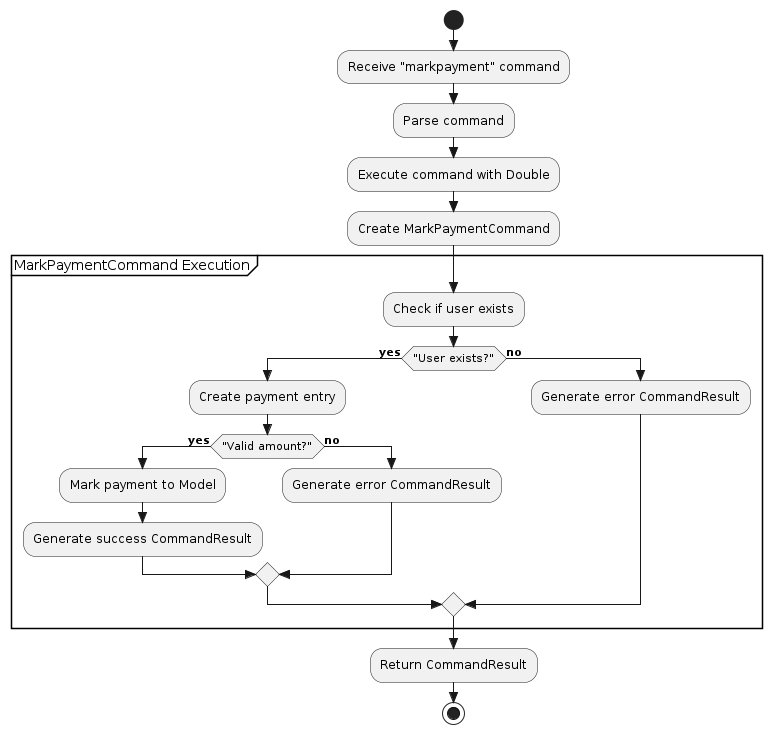
Mark Payment Feature
The MarkPaymentCommand allows marking a student's payment as completed. This is typically used once a payment has been processed or received.

Implementation
- The user inputs a command with the
-markpaymentflag, followed by the student'suniqueId. - The system identifies the corresponding student record and updates the payment status to reflect that it has been paid.
- A confirmation is returned to the user upon successful update.
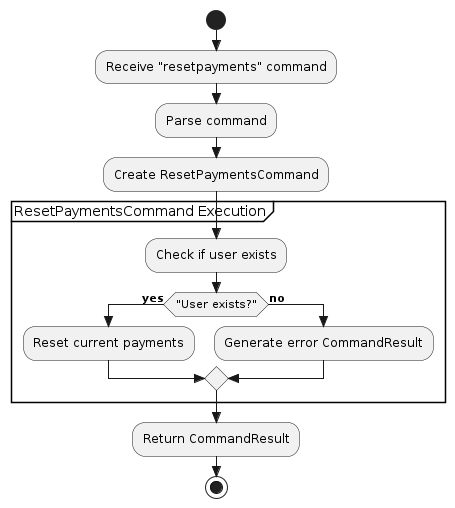
Reset Payments Feature
This feature enables the system to reset the payment status of students, which is useful when a student has fully paid their dues or when adjustments to their payment records are needed.

Implementation
- A specific command with the
-resetpaymentsflag and the student'suniqueIdis issued by the user. - The system locates the student's record and resets the payment information, clearing any completed payments or dues.
- A success message is sent to the user, confirming the reset.
Conclusion
This guide provides a concise overview of the payment management functionalities within the system, designed to assist developers in understanding and utilizing these features effectively. For further details or clarification, please contact the development team.
Student Exam Management System
Introduction
This section covers the exam management system including add exam and delete exam.
Features Overview
Add Exam: Allows the addition of exam records to student accounts using unique identifiers. Delete Exam: Enables the deletion of exam records from student accounts.
Add Exam Feature
The AddExamCommand enables users to add exam records to students by specifying a unique student ID, exam name, exam date, and optionally, exam time.
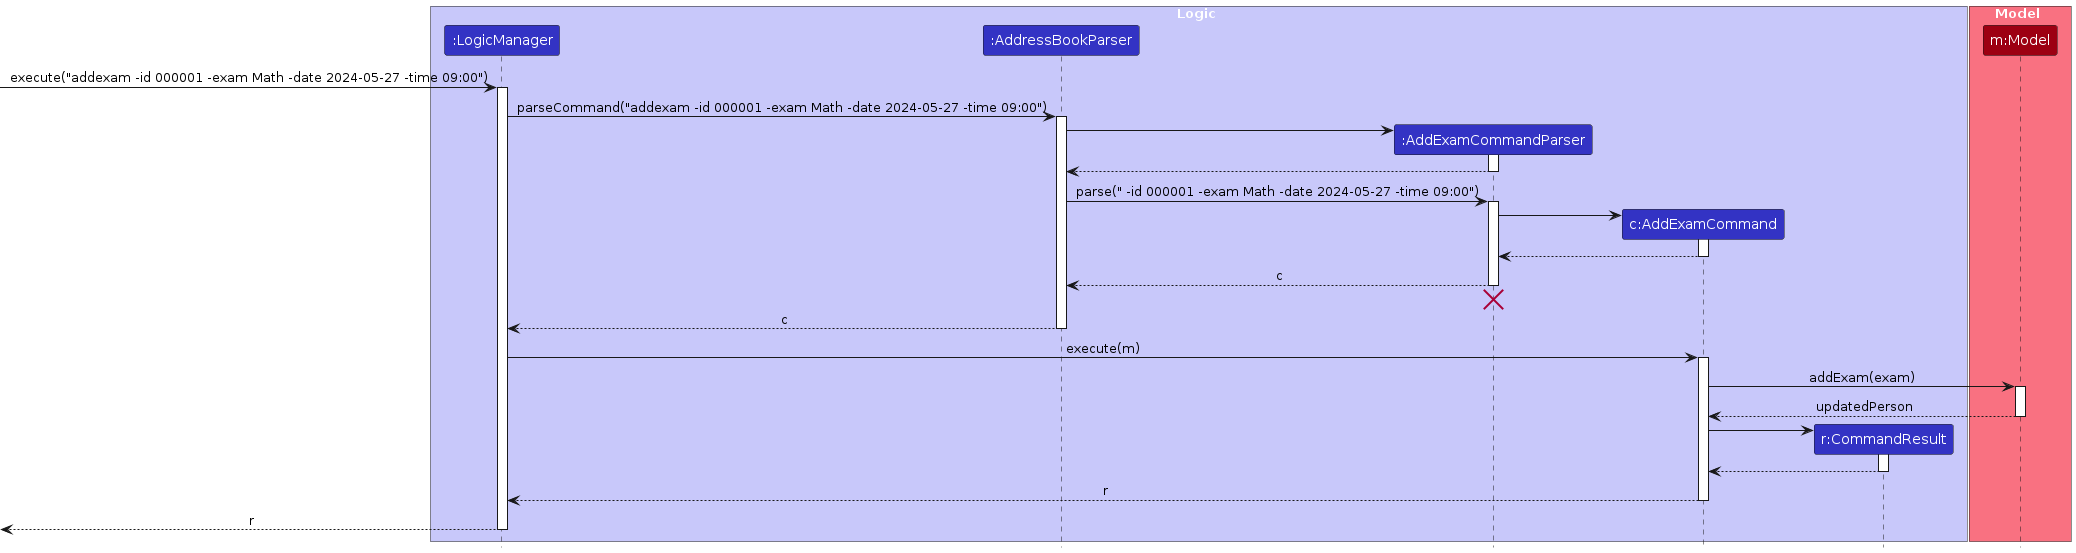
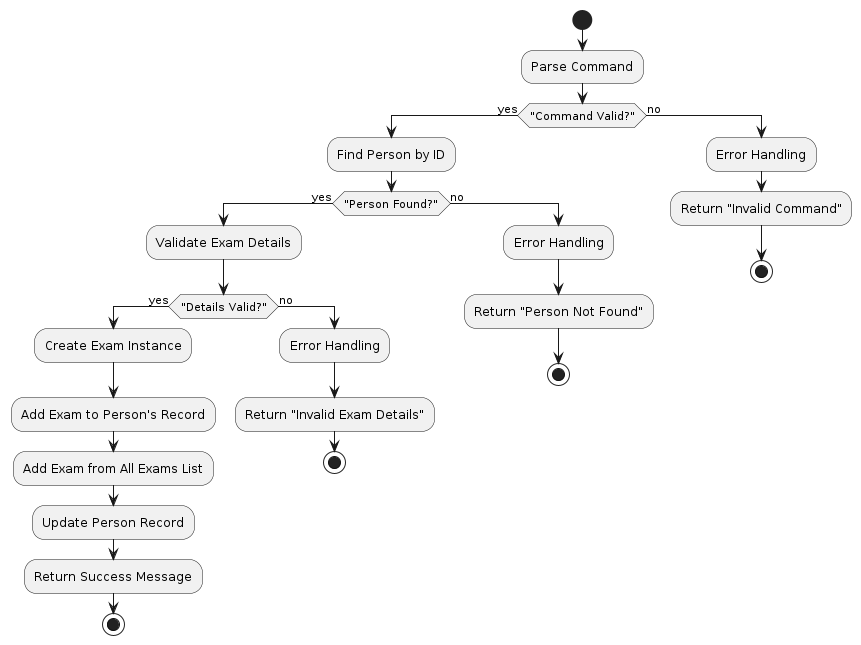
Implementation
- The user inputs a command with the -addexam flag, followed by the student's uniqueId, exam name, exam date, and optionally, exam time.
- The system parses this command, extracting the necessary details.
- A new exam record is created and added to the student and the AllExamsList in the system.
Design Considerations
Aspect: Compulsory Fields
Alternative 1: Both Date and Time are Compulsory
- Pros: Ensures that users provide complete information for scheduling exams, reducing ambiguity.
- Cons: Adds extra burden on users to provide both date and time even if they may not have exact timing.
Alternative 2 (current choice): Only Date is Compulsory, Time is Optional
- Pros: Provides flexibility to users who may not have specific time information for exams.
- Cons: May lead to incomplete scheduling if users don't specify exam times.
Aspect: Restrictions on Date and Time
Alternative 1: Allow Past Dates and Times
- Pros: Gives users the freedom to schedule exams retroactively if needed.
- Cons: May lead to confusion or misuse if users inadvertently schedule exams for past dates or times.
Alternative 2 (current choice): Allow Current Date with Past Time
- Pros: Allows users to schedule exams for the current day, even if the time has already passed.
- Cons: Still prevents scheduling exams for past dates to avoid confusion and errors.
Alternative 3: Do Not Allow Past Dates or Times
- Pros: Ensures that all scheduled exams are for future dates and times, reducing the likelihood of scheduling errors.
- Cons: Restricts users from scheduling exams for immediate or past instances, which may be necessary in certain situations.
Aspect: Time Slot Conflicts
Alternative 1: Allow Exams at the Same Time Slot
- Pros: Provides flexibility for users to schedule exams without strict limitations on time slots.
- Cons: May lead to scheduling conflicts or confusion if multiple exams are scheduled for the same time slot.
Alternative 2: Does Not Allow Exams at the Same Time Slot
- Pros: Helps prevent scheduling conflicts and ensures each exam has its dedicated time slot and prevent errors. More similar to real world contexts.
- Cons: Less flexibility.
Delete Exam Feature
The DeleteExamCommand allows deleting a specific exam record from a student.
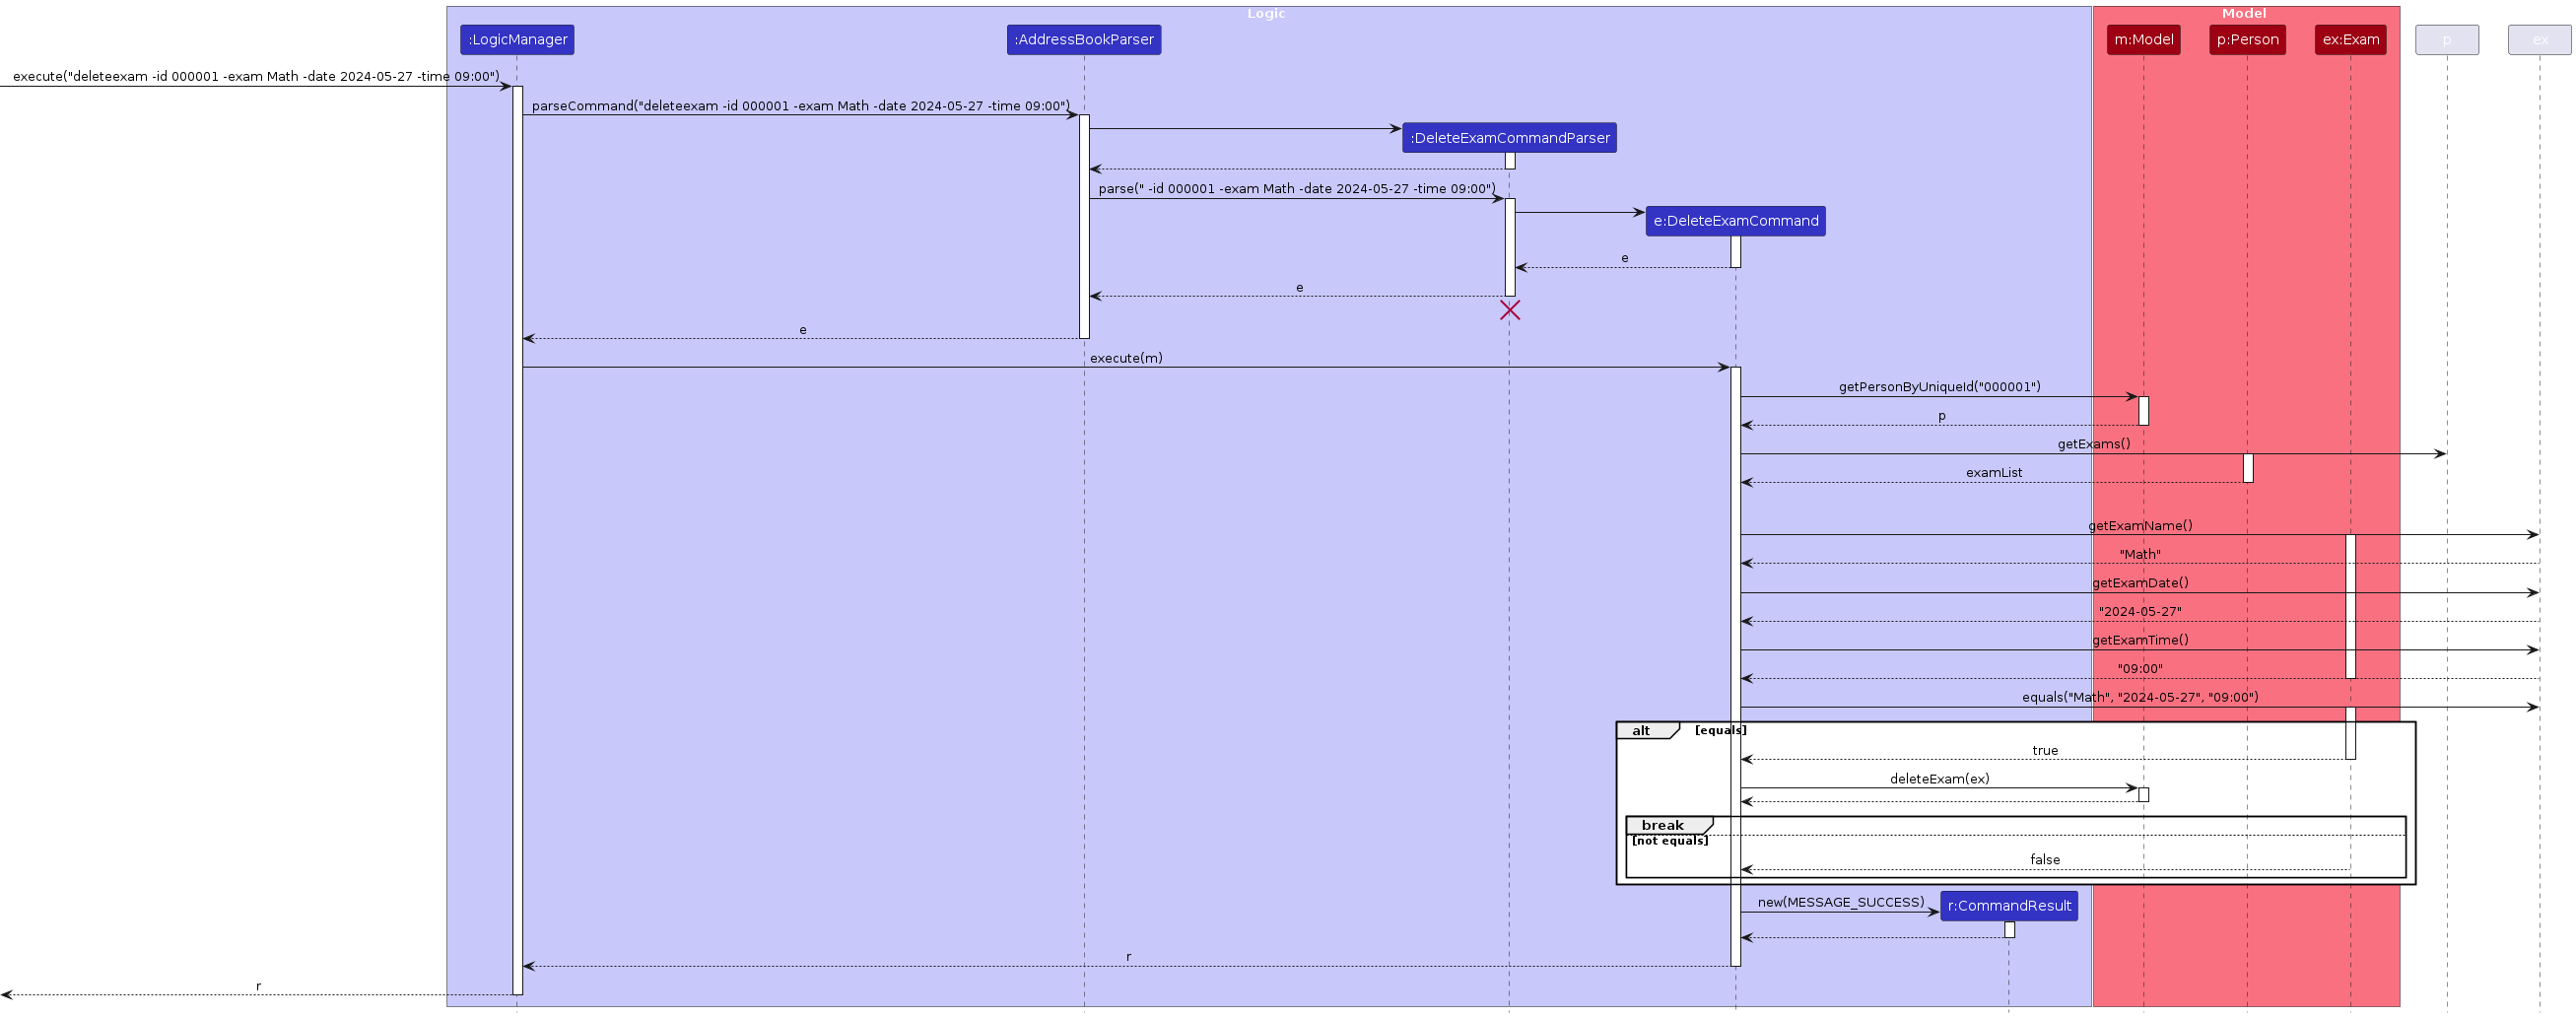
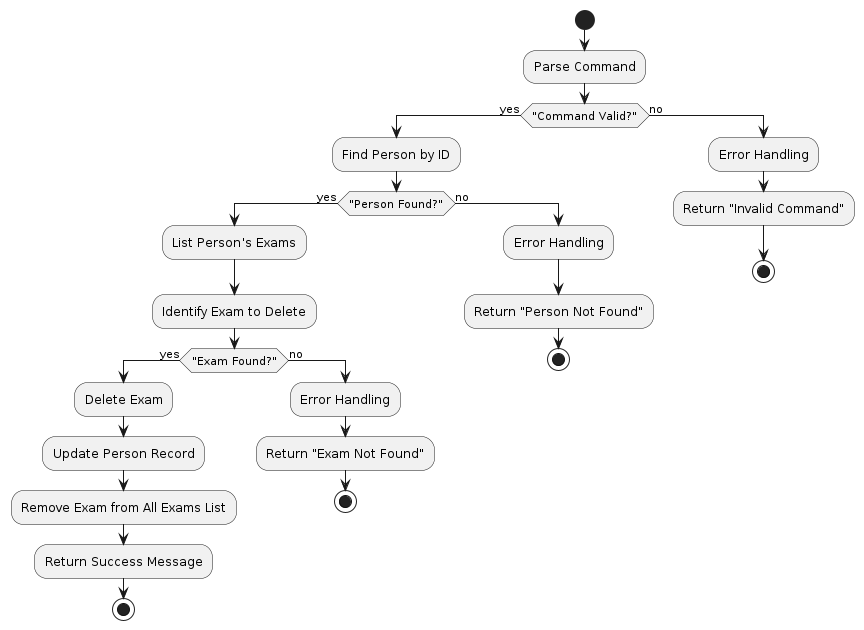
Implementation
The user inputs a command with the -deleteexam flag, followed by the student's uniqueId, exam name, exam date, and optionally, exam time. The system identifies the corresponding student and the specified exam. The system removes the specified exam record from the student and AllExamsList.
Conclusion
These descriptions provide an overview of the exam management features, their purposes, and how they are implemented in the system. They also include sequence diagrams illustrating the interactions between the user and the system for each feature. For further details or clarification, please contact the development team.
Documentation, logging, testing, configuration, dev-ops
Appendix: Requirements
Product scope
Target user profile:
- a tutor that has a need to manage a significant number of contacts of students
- prefer desktop apps over other types
- can type fast
- prefers typing to mouse interactions
- is reasonably comfortable using CLI apps
Value proposition:
- Easier time managing their contacts (fast retrieval of relevant info)
- More organization & personalisation
- Easier time to track Student’s grades and weaknesses
- Manage parent’s expectations
- Easy tracking of payment
- Logging of Lessons for retrieval in the future
- Easily track Exams dates
User stories
Priorities: High (must have) - * * *, Medium (nice to have) - * *, Low (unlikely to have) - *
| Priority | As a … | I want to … | So that I can… |
|---|---|---|---|
* * * | Tutor | add a student | track the details of the student |
* * * | Tutor | view student details summary on main page | get a brief idea of the student while navigating the list |
* * * | Tutor | delete a person | remove entries that I no longer need |
* * * | Tutor | view single students detail | see the individual detail for a single student |
* * * | Tutor | view total number of students | check if I have space for more students |
* * * | Tutor | track my payments | won't miss out on any payments |
* * * | Tutor | track my students' exams | personalise and plan better for lessons |
** | Tutor | log the lessons of a student | analyse past lessons when planning |
* | Tutor | filter students by their subjects | manage my students better |
Use cases
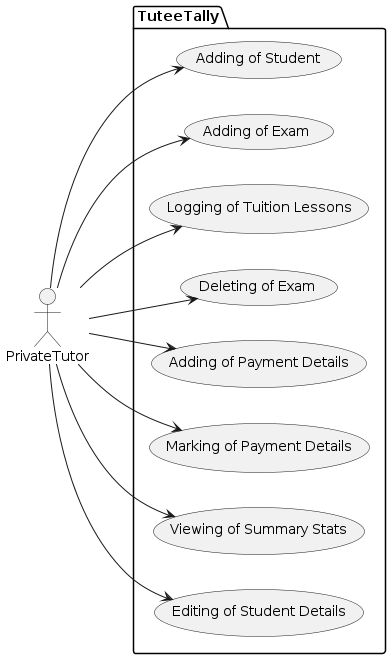
[!NOTE] For all use cases below, the System is
TuteeTallyand the Actor is theuser, unless specified otherwise
Use case: Add a Student
MSS (Main Success Story)
User initiates the command to add a student by providing the student's name, address, contact number, subject, and level.
TuteeTally processes the provided information, adds the student particulars into the system, and assigns a unique ID to the student.
TuteeTally displays a confirmation message along with the details of the newly added student at the top of the list.
Use case ends.
Extensions
1a. User inputs the command in an incorrect format.
- 1a1. TuteeTally shows an error message and the correct command format.
Use case ends.
1b. User enters a name that already exists in TuteeTally.
- 1b1. TuteeTally generates and assigns a unique ID to the new student to avoid duplication.
Use case resumes at step 2.
1c. User omits a required field in the command.
- 1c1. TuteeTally shows an error message indicating the missing field.
Use case ends.
Use case: View Student Detail
MSS
User requests to view details of students either by listing all or searching by name or ID.
TuteeTally retrieves and shows the relevant student details based on the request.
TuteeTally opens a popup and shows the past log entries of the student.
Use case ends.
Extensions
2a. The requested student does not exist or the list is empty.
- 2a1. TuteeTally displays a message indicating no such student exists or the list is empty.
Use case ends.
2b. User inputs an incorrect command format for viewing details.
- 2b1. TuteeTally shows an error message and the correct command format.
Use case ends.
- 3a. The requested student does not have valid logs recorded.
- 3a1. TuteeTally opens a popup containing "No logs yet!" instead. Use case ends.
Use case: View Summary Statistics
MSS
User requests to view summary statistics of students.
TuteeTally processes the request and displays the total number of students along with other relevant statistics.
Use case ends.
Extensions
2a. There is an error in processing the request.
- 2a1. TuteeTally displays an error message in red.
Use case ends.
Use case: Delete a Student
MSS
User requests to list Student
TuteeTally shows a list of Student
User requests to delete a specific Student in the list
TuteeTally deletes the Student
Use case ends.
Extensions
2a. The list is empty.
Use case ends.
3a. The given index is invalid.
3a1. TuteeTally shows an error message.
Use case resumes at step 2.
Use case: Add Payment
MSS (Main Success Story)
The user selects the option to add a payment.
The system prompts the user to enter the student's unique ID and the payment amount.
The user enters the required information and submits the command.
The system validates the information and confirms the student's account exists.
The system adds the payment to the student's account and updates the balance.
The system notifies the user that the payment has been successfully added.
Use case ends.
Extensions
1a. The user enters an invalid student ID.
- 1a1. The system displays an error message and prompts the user to re-enter the student ID.
Use case resumes at step 2.
2a. The user enters an invalid payment amount.
- 2a1. The system displays an error message and prompts the user to re-enter the payment amount.
Use case resumes at step 3.
Use case: Mark Payment
MSS (Main Success Story)
The user selects the option to mark a payment as complete.
The system prompts the user to enter the student's unique ID and details of the payment to be marked as complete.
The user enters the required information and submits the command.
The system validates the information and confirms the student's account and pending payment exist.
The system marks the specified payment as complete and updates the account status.
The system notifies the user that the payment has been successfully marked as complete.
Use case ends.
Extensions
1a. The user enters an invalid student ID.
1a1. The system displays an error message and prompts the user to re-enter the student ID.
Use case resumes at step 2.
2a. The user enters an invalid payment amount.
2a1. The system displays an error message and prompts the user to re-enter the payment amount.
Use case resumes at step 3.
3a. There are no outstanding payments for the student.
3a1. The system informs the user there are no payments to mark as complete.
Use case ends.
Use case: Add Exam
MSS (Main Success Story)
The user selects the option to add an exam.
The system prompts the user to enter the student's unique ID, exam name, exam date, and optional exam time.
The user enters the required information and submits the command.
The system validates the information and confirms the student exists with student ID.
The system adds the exam to the student.
The system notifies the user that the exam has been successfully added.
Use case ends.
Extensions
1a. The user enters an invalid student ID.
1a1. The system displays an error message and prompts the user to re-enter the student ID.
Use case resumes at step 2.
2a. The user enters an invalid exam date or time.
2a1. The system displays an error message and prompts the user to re-enter the exam date or time in the command.
Use case resumes at step 3.
Use case: Delete Exam
MSS (Main Success Story)
The user selects the option to delete an exam.
The system prompts the user to enter the student's unique ID, exam name, exam date, and optional exam time.
The user enters the required information and submits the command.
The system validates the information and confirms the student exists and the specified exam exist.
The system removes the exam from the student.
The system notifies the user that the exam has been successfully deleted.
Use case ends.
Extensions
1a. The user enters an invalid student ID.
1a1. The system displays an error message and prompts the user to re-enter the student ID.
Use case resumes at step 2.
2a. The user enters incorrect exam details.
2a1. The system displays an error message and prompts the user to re-enter the exam details.
Use case resumes at step 3.
Planned Enhancements
Team size: 4
- Update Edit command to use ID instead of index.
- Improve the UI such as removing all white spaces from it.
- Learning styles can be tagged to Person so that it doesn't need to be logged every lesson.
- When exiting the GUI using the "x" button, if there are past exams stored in the JSON file, the application should save the current data to the JSON file, similar to how it behaves when using the "exit" command.
- View -id or -name should automatically filter and show the exams of the person on the right.
- Log window will update its content to respond to addition of logs to a student.
- Log entry can be deleted and its fields can be edited, including editing the date and time of the log to a custom date to match the lesson time.
- Implement checking of duplicate persons to ensure the same person is not recorded multiple times.
Non-Functional Requirements
- Should work on any mainstream OS as long as it has Java
11to support JavaFx. - Should be able to hold up to 1000 persons without a noticeable sluggishness in performance for typical usage.
- A user with above average typing speed for regular English text (i.e. not code, not system admin commands) should be able to accomplish most of the tasks faster using commands than using the mouse.
- System should provide quick responses to user commands.
- Should have user-friendly design for interface, so it is intuitive to use.
Glossary
- Mainstream OS: Windows, Linux, Unix, MacOS
Appendix: Instructions for manual testing
Given below are instructions to test the app manually.
Note: These instructions only provide a starting point for testers to work on; testers are expected to do more exploratory testing.
Launch and Shutdown
1. Initial Launch
- Download the jar file and copy it into an empty folder.
- Double-click the jar file. Expected: Shows the GUI with a set of sample contacts. The window size may not be optimum.
2. Saving Window Preferences
- Resize the window to an optimum size. Move the window to a different location. Close the window.
- Re-launch the app by double-clicking the jar file. Expected: The most recent window size and location is retained.
Deleting a Person
1. Deleting a Person While All Persons Are Being Shown
- Prerequisites: List/view all persons using the
listorview -allcommand. Multiple persons in the list. - Test Case:
delete 000001Expected: Contact with theID#000001 is deleted from the list. Details of the deleted contact shown in the status message. Timestamp in the status bar is updated. - Test Case:
delete 000000Expected: No person is deleted. Error details shown in the status message. Status bar remains the same. - Other Incorrect Delete Commands to Try:
delete,delete x,...(where x is larger than the list size) Expected: Similar to previous.
Payment Commands
Adding a Payment to a Student Account
- Command:
addpayment - Description: Adds a payment record to a specified student by their
ID. This command allows for specifying the payment amount either as a numerical value or as a text string for more descriptive purposes.
Prerequisites
- The student associated with the given
IDmust exist within the system.
Usage
- To add a payment with a numerical amount:
addpayment -id ID -amount 100.00
Expected Outcome: A payment of $100.00 is added to the student identified byID. The system confirms the addition with a success message and updates the student's payment history accordingly.
Marking a Student's Payment
- Command:
markpayment - Description: Marks a specified payment as complete for a student. This command is used to update the status of a student's payments to reflect that they have been successfully processed or received.
Prerequisites
- The student associated with the given
IDmust exist.
Usage
- To mark a payment as complete:
markpayment -id ID -payment PAYMENT_AMOUNT
Expected Outcome: The payment identified byPAYMENT_AMOUNTfor the studentIDis marked as complete. The system updates the payment status and provides a confirmation message.
Extensions and Error Handling
- Invalid ID: If an invalid
IDorPAYMENT_AMOUNTis provided, the system will return an error message indicating the issue and suggesting corrective actions. - No Outstanding Payments: If there are no outstanding payments to mark as complete, the system will notify the user accordingly.
Additional Notes
- These commands are designed to interact seamlessly with the system's payment management module, ensuring accurate tracking and reporting of student payment statuses.
- Always ensure that the unique identifiers (
IDandPAYMENT_AMOUNT) are correctly entered to avoid discrepancies or errors in payment processing.
Resetting Payments for a Student Account
- Command:
resetpayments - Description: Resets the payment status for all recorded payments in a specified student identified by
ID. This command is used when a student's payment record needs to be cleared, typically after all dues have been settled or in case of adjustments.
Prerequisites
- The student account associated with the given
IDmust exist.
Usage
- To reset all payments for a student:
resetpayments -id ID
Expected Outcome: All payments recorded for the student identified byIDare reset. The system confirms the reset with a success message, indicating that the student's payment history is now cleared.
Extensions and Error Handling
- Invalid ID: If an invalid
IDis provided, the system will return an error message indicating that the student could not be found. - No Recorded Payments: If the student does not have any recorded payments, the system will notify the user that there are no payments to reset.
Additional Notes
- Use the
resetpaymentscommand with caution, as it will clear all payment records for the specified student, potentially impacting their payment record. - Ensure accuracy when entering the
IDto avoid unintentional resets of payment information for the wrong student.
Exam commands
Adding an Exam to a Student Account
- Command:
addexam - Description: Adds an exam record to a specified student by their
ID. This command allows for specifying the exam name, exam date, and optionally, exam time.
Prerequisites
- The student associated with the given
IDmust exist within the system.
Usage
- To add an exam:
addexam -id ID -examname EXAM_NAME -date EXAM_DATE [-time EXAM_TIME] - Only EXAM_DATE from current date onwards can be used.
- EXAM_DATE should be in the format of yyyy-MM-DD.
- EXAM_TIME should be in the format of HH:mm
Expected Outcome: An exam with the specified name, date, and optionally time is added to the student identified byID. The system confirms the addition with a success message and updates the student's exam records accordingly.
Deleting an Exam from a Student Account
- Command:
deleteexam - Description: Deletes a specific exam record from a student by specifying the student's
ID, exam name, exam date, and optionally, exam time.
Prerequisites
- The student associated with the given
IDmust exist and have the specified exam recorded.
Usage
- To delete an exam:
deleteexam -id ID -examname EXAM_NAME -date EXAM_DATE [-time EXAM_TIME]
Expected Outcome: The exam with the specified name, date, and optionally time is removed from the student identified byID. The system confirms the deletion with a success message, and the student's exam records are updated accordingly.
Extensions and Error Handling
- Invalid ID: If an invalid
IDis provided, the system will return an error message indicating the issue and suggesting corrective actions. - No Recorded Exam: If the student does not have the specified exam recorded, the system will notify the user that there are no exams to delete.
Additional Notes
Always ensure that the unique id, exam name, and date are correctly entered to avoid discrepancies or errors in exam management. These commands are designed to interact seamlessly with the system's exam management module, ensuring accurate tracking and reporting of student exam records.